Thursday, 15 December 2011

Machine Production Techniques - Lesson Four

This lesson was the last before the Christmas break, and I was eager to get as much completed as I possibly could. My next task was to create the grooves and rebates for the top, back, sides, front and back to slot into. To create theses grooves I used a hand router and also the overhead router.

Piece of wood with groove created by hand router 
These grooves took most of the lesson, as there were a limited number of routers available, so I had to wait till one was free.  The last thing that I did was to cut the front and back panels and then create a rebate on all the edges.

The hardest part of this lesson was getting comfortable with using the router, as I found it hard to control it on some of the edges. After this though, it was an easy and straight forward lesson. 

Wednesday, 14 December 2011

Machine Production Techniques - Lesson Three

This lesson was the lesson when we cut all the wood for the toolbox carcass, and to do this we used the dimension saw, and worked as a class.

The main problem with working like this was the amount of time it took. This meant that cutting the panes which could have taken twenty minutes took over two hours. The advantage of this though was that all the pieces would be identical and cut to the correct size. After the wood was cut I labelled it up ready for tomorrow's lesson when I would start to groove and rebate the panels.

Thursday, 8 December 2011

Machine Production Techniques - Lesson Two

This lesson was all about the different machines in the workshop. I didn't have time to take any photos as we were working in groups, but we all used every machine that would be needed in this module.

The machines we were inducted on were, the cross-cut saw, the ripsaw, the surface planer, the thickness planer, the band saw, the disc sander, the bobbin sander.

All the health and safety was written in a very helpful booklet, which allows me to use it at any time whilst in the workshop.

This lesson was very useful, as it now means that I know how to use each machine properly and safely whilst working on any modules in the future. 

Wednesday, 7 December 2011

Machine Production Techniques - Lesson One

This was the first lesson for Machine Production Techniques, and we began by having a module briefing.

In the module briefing we spoke about what was required for the toolbox and also about the table with a drawer. After we received a booklet with information about the module, we learnt about how to set up and use a router.

The first thing was how to put a cutting piece into the router. To begin with you first lock the cutter into place using the press button, and then using a spanner undo the bolt.


Once the bolt is done, you can then put the cutter piece into the router. You simply slide it inside the bolt. One important thing is to make sure you go to at least the flat line pictured on the cutter, so you can not see the arrow head. Finally you just had to re-tighten the bolt to thumb pressure.
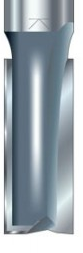
Minimum cutter depth
Once this was in place, we then learnt how to start the router. This is simply done by the right hand. To start you have to push the safety switch down with your thumb, and then pull in the finger trigger towards you. You can also lock the router on so it stays on at all time, and this is done by applying some more pressure to the thumb trigger and then realising it.  
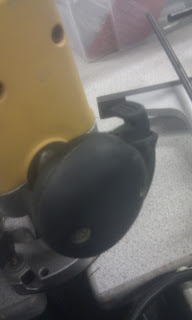
Right handle with thumb and finger trigger.
I then learnt another important thing when using a router, and that is the direction of cut. This means that when you are creating a rebate you want to be pushing it into the material, to stop it from catching the material and tearing the material. This can cause the router to jump towards you, and be very dangerous. The direction is clearing shown on the base of the router.

Direction of cut shown on the base of the router
I then learnt the way to set the router for certain cuts, and this includes the depth of the cut. TO plunge the router into a material, you first realise the left handle by twisting it, and this then freely moves the router up and down. You then twist the handle again to lock it into place.

Arrows showing twisting motion of handle
 You can also set the depth using a depth stop, this is done by realising a wing nut on the side, and then twisting the bar to the bottom, this can be re-zeroed depending on different cuts.
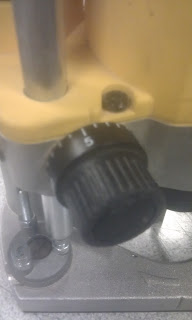
adjusting screw

 You can also place the object that your rebating underneath the bar, so you easily cut to the right height.
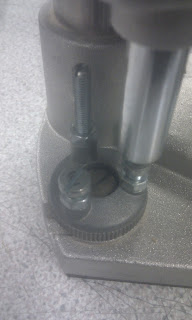
Area where you can place certain objects
Finally I learnt about the fence that you put on the router, and this allows you to make parallel cuts at any distance from the edge of the piece of wood.
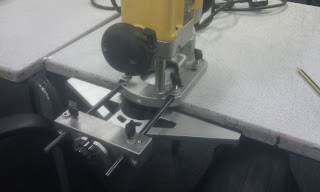
Router with fence attached
The first day was interesting as we learnt about the module, and also how to correctly set up a router, the hardest part was to learn how to lock the router so it would carry on when you realised the trigger.

Saturday, 3 December 2011

Hand Production Techniques - Lesson Seventeen


Today the cabinet was handed in, and was completed on time. Over the last week I finished the drawers and drawer slips, however I joined the back on upside down on one, so had to use it for the second drawer, but it went together in the end.

Also when clamping up the first drawer, I forgot to put in the drawer slips, which meant i had to undo some of the clamps again to fit them in.

I also clamped up both drawers successfully, and created a handle and drawer stops in CAD and cut them out on the laser cutter.

Finally I veneered the board which I then cut up, and used as the drawer bottoms.

I have included photos of the different stages, as well as the finished cabinet.

Drawer stop Clamped up

Drawer clamped up


Thursday, 24 November 2011

Hand Production Techniques - Lesson Sixteen

Over the last week I have done quite a lot of work on the cabinet.

The first thing that I carried out wast dry tested the cabinet. This means that I put it all together, without glue to make sure it all goes together properly.

Dry testing carcase

Once I had dry tested it I then glued and clamped it all together, and then began work on the drawers.

Carcase Clamped up
Carcase finished gluing

To glue and clamp up properly you have to make sure you don't cover up the pins with the packing piece, otherwise the joint wont go together properly, and the packing piece should reach both clamps. Clamping up the carcase was relatively easy, as it was already square, and I just got someone else to help hold the packing pieces in place while I tightened the clamps.

I also planed and cut the sides to length and size, and also started the drawer fronts. Finally I also started making the drawer slips, which were made out of spare Walnut which I had left from the fronts. However during the week when I was finishing off one of the drawer fonts I cut it to small, and therefore had to make another one of of scrape would, which meant they were slightly different shades.

Slightly different shades of Walnut.
However once I corrected this mistake I started to create the joints for the first drawer.


Apart from the mistake at the beginning of the week, everything went smoothly, and I managed to get two joints complete.

Friday, 18 November 2011

Hand Production Techniques - Lesson Fifteenth

Over the last week and today's lesson I have managed to get of the other joints complete, but the main focus of this lesson was veneering. I will be veneering both the back panel, and also the drawer bottoms.

I first learnt about different types of veneering:

The first kind of veneer is called 'Running Veneer', which is when two pieces of veneer are joined together, with the grain going in the same direction on both piece.

Running Veneer

The next is called 'Book Matched'. This is when two pieces of veneer are joined together, with the grain going in the opposite directions, and look like the pages in a book.
Book Matched Veneer
Thirdly this pattern of veneer is 'Diamond'. Diamond is when four pieces of veneer are joined together, and the grain flows smaller into the center, creating a diamond shape.

Diamond Veneer
The last pattern is the 'Reversed Diamond', which is the same as the previous pattern, but the grain flowing in the opposite direction.
Reversed Diamond Veneer 
To join veneer you first have to wet strips of veneer tape that are 50mm long, are spaced out across the join. Once you have done this, then you place a strip all the way down the join.
 

After the lesson today I decided that I would veneer the back of the cupboard. To do this I first went and picked the veneer which I required from the veneer shed. 

Next I cut the veneer up to size using a veneer cutter. To do this I worked with others to make it easier.

Veneer Cutter
Next I glued the over sized veneer sheets on either side of the backboard, and then placed it into the veneer press for ten minutes. Finally I then cut the over sized veneer to the board size, and then cut the board down to size to create the finished backboard.
 
Finished veneered backboard

Test fitting the backboard in cabinet


Thursday, 10 November 2011

PPD - Task 3 - Pratt's Furniture and local furniture designers

This week is Task 3 of the Personal and Professional Development (PPD), and it is in three parts. Part one is all about Pratt's Furniture in Leeds, and what furniture they make. Part two is all about the ways which Furniture Makers mark their products and finally part three is about furniture makers which are local to my home away from university.


Part 1:


The furniture designer I have chosen to write about is Schneider Designs.


1. What kind of furniture do they make (In the designers own words):


"At Tom Schneider, we are passionate about creating distinctive contemporary furniture with a strong sense of movement. The collections are pure and honest; they are beautiful in form and need no additional detailing. We believe that furniture should stand the test of time and not go out of fashion; instead they should become contemporary furniture classics. Every piece of furniture is individually handmade by a team of craftsmen, which means that by ordering a Tom Schneider piece of furniture, you are choosing a truly unique, inimitable creation."


2. How many ranges, options, choices of wood / fabric they offer:


They have a wide range of furniture, which includes the rooms:


  • Hallway
  • Living Room
  • Bedroom
  • Dining Room
  • Kitchen


They also offer to design and make bespoke furniture, to your exact details and requirements. I found this unusual, as not many I was looking at offered this amount of flexibility.


There website lists all the materials that are available to be picked, and include images of each one. Below is a list of all the woods:


  • Maple
  • Ash
  • Oak
  • Cherry
  • Walnut
  • Wenge
  • Zebrano
  • Ebony
  • Black 
  • White


And the fabrics:


  • Leather - Rio and Harlequin ranges
  • Any material of your choice


3. What awards have they won:


I couldn't find any awards which were listed on their website, however they have been in many magazine publications, such as 'Cabinet Maker' and the 'Times' Magazine.


4. What is their most expensive product:


There most expensive product was this Caress Corner Sofa, at £5,595.


5. What do the company think their unique selling point is:


They feel that it is that all their furniture is handmade, and will never go out of fashion. They also believe in simplistic furniture, but curved shapes, especially within the wooden pieces of each piece of furniture.


Part 2: Find five different ways manufacturers mark / brand their furniture:


1. 


Wally Woodworker

2.
Wood Touch furniture


3.


Bob Timberlake
4.

Charles Mackintosh
5.

Wilf Hutchinson

Part 3: Find three furniture designers within a three mile radius of my home:

Gallery136:

  • http://www.gallery136.co.uk
  • A wide range of all furniture for the house, along with ceramics and Artwork.

Made in wood:

  • http://www.madeinwood.com/index.php
  • A wide range of all furniture for the house, including paneling and worktops.


Blades Joinery:

  • http://www.bladesjoinery.com/
  • Furniture and custom built in storage units.
  • They employ five people


Hand Production Techniques - Lesson Fourteen

Today was a slow day, where I completed one joint, and also made the divider so it fitted into the grooves.  I made the divider first, and this was just cutting it to the right size, which is shown below. this was quite easy, however I did have to sand it down and chisel the groove slightly larger to get it to fit correctly.

Divider cut ready to size
I then cut and fitted my first joint. This was a mitred dovetail, and was quite easy to get to fit. However I miss-cut one of the pins, which means that you can slightly see the groove from the outside. Also I learnt from videos on the internet how to get mitres to fit as tightly as possible by running a saw along the join, and then finishing the joint by tapping it together.

Mitre joint

Finished joint - Corner 1

Overall this lesson went really well, and now that I have done the first joint, it will be easier to do the other four corners.


Wednesday, 9 November 2011

Hand Production Techniques - Lesson Thirteen

During this lesson I decided it was time to create the groove for the back and divider of the cabinet. I did this using the methods previously explained further ↓ the blog ;)

The main problem I had during this lesson was the fact there were only two combination planes, and I left mine at home :( . However I decided it would be better to go home and pick it up, rather then waste lesson time.

I also had to put on a wooden guard on the plane to stop it from marking the cabinet wood. The groove that I created was 4mm deep, and 6mm wide.

Wood attached to guard

Groove cut in wood ready for cupboard back


I then used a combination of chisels and a number 71 plane to create the divider groove. The biggest problem was tear out along the edge of the groove, but I learnt from the first one that I did and chisels deeper first. This meant that the second groove was much better. This groove was 16mm and 4mm deep.


Grooves complete


Friday, 4 November 2011

Hand Production Techniques - Lesson Twelve

After yesterday's lessons mistake of the corner being planed to low, I learnt from my mistakes and this lesson went much smoother. I managed to finish hand planing the face and edge of the wood, and then using the Surface Planer, made sure that the face and two edges were perfectly flat and square.

Above: Surface Planner

After this it was put through the Thicknesser, to get it to the perfect height of 16mm, ready to be cut into the correct sizes, 

Above: Thicknesser


Finally I then stacked it using stickers to allow air to circulate around all the faces of the wood.


Wednesday, 2 November 2011

Hand Production Techniques - Lesson Eleven

This lesson was primarily used to sort out all the wood which was going to be used to create the carcase of the cupboard.

This wood had been ordered  and delivered, so all we had to do was mark any defects, cut it to length and plane a face and edge.

To begin I first used chalk to label the piece of wood with my name, and also any defects on any of the edges, so when I marked out my cabinet pieces there would not be any chips or dents.

Once I had marked out the the defects, I then cut it into length using the Radial Arm Saw.

Above: Radial Arm Saw

Finally I began to hand plane one face and an edge. To stop the wood from warping I also lightly planed the top service of the other side. I used a variety of hand planes, including a number 4, 5, and 7 jointer plane.

Above: Wood being planed to create a flat face


Although this was quite an easy task to understand, it took a long time, and A LOT of hard work, as I still haven't finished planing yet and will continue in tomorrows lesson. However I did hit a problem when I realised one corner was lower then the rest, which meant I have to plane the rest of the face to meet this corners height. 

Friday, 21 October 2011

Hand Production Techniques - Lesson Ten

I never realized how many different types of Dovetail joints there were, but I learnt another one today. This Dovetail Joint was a Mired Corner Dovetail.

This is very similar to the Through Dovetail, apart from (as the name says) mitered pins on each end. To help understand see below for diagrams of each piece of wood.

The Tail Board:
Above: Shows end of Tail Board with areas to cut out

Above: 3D image of Tail Board

The Pin Board:

Above: Shows end of Pin Board with areas to cut out
Above: 3D image of Pin Board

Above: Side view which will be the
same on each end of both boards

I think that aesthetically this is the best looking Dovetail Joint that I have made. It was very hard to understand how to create this joint initially, but with an example joint that I could take apart, I soon learned just how easily it really is. The hardest part of joint was getting the mitre correct on both pieces of wood, and therefore getting it to joint squarely.

 I will add some photos later, as they are on a different camera ;) .