Thursday 26 January 2012

Machine Production Techniques - Lesson Ten

Today's lesson was mainly used to sort, mark out and cut the timber which came in this morning to sawn lengths. This was then stickered and stacked to allow it to dry. I also began on the legs, and the first thing I did was to create a face and edge. After this I then thicknessed each leg to the correct dimensions.

Above: Thicknessing the legs to correct dimensions
 I then spent the rest of the lesson marking out the mortises ready to cut out. We then show how to use the mortiser. This is a machine which has a drill piece inside a square cutter. When you pull down on the arm it first drills a hole, and then the cutter slices the wood to leave a square.

Above: Mortiser bits.

The Mortiser also has a bed which can be adjusted from left to right and front to back by two wheels, allowing you to make multiple mortises or long ones without have to un-clamp your work every time.

Wednesday 25 January 2012

Machine Production Techniques - Lesson Nine

This lesson was the start of the table with drawer which we will be making. The lesson was a theory lesson, which explained about the mortise and tenon joints we will be making.

A brief description on a mortise and tenon joint:


  • Means of mechanically joining two pieces of wood
  • Strong - Only moves in one direction
  • CUT MORTISE FIRST!!! - Drill bits at certain widths - difficult to fine tune the width of mortises
  • Tenon cut after - easy to fine tune to mortise
Why add shoulders:

Above: Tenon with shoulders
  • Prevents racking
  • Positive stop location for a tenoned component
  • Hides the edges of the mortise
The rule of thirds


Normally for the tenon part of the joint, you divide it by three, and that will determine roughly how big the tenon will be. This may have to be adjusted slightly depending on the cutter.

Above: Rule of thirds
Our Rails:
We are doing the tenons for the table with this specification:


  • Split into 4mm, 10mm, 4mm
  • Reveal - 3mm
  • 37mm maximum length of tenon (Mitred at end - 45 degrees)
  • Top shoulder and haunch 10mm
  • 150 MAXIMUM tenon length till it becomes forked.

Above: Forked tenon used in leg construction with haunch
Finally in this lesson we looked at the spindle moulder. This is a machine which is used to shape pieces of wood by using a jig. This is what I am going to be using to shape the legs of the table.

Above: Example spindle moulder
A few important rules are that it is a maximum cut of 1.1mm, and to shape the legs you have to have one mortise up and one facing you for the first cut, and then one facing you and one facing down to cut the profile on the outside edges of the leg.

Saturday 21 January 2012

PPD - Task 5 - Interiors UK 2012

On Monday (23/01/2012), we will be going to the Interiors UK 2012 exhibition, which is hosted in Birmingham.

For this task I will select three furniture manufacturers, three fabric or textile companies, and three lighting companies with explanations about why I want to go visit them at the exhibition.

Three Furniture Makers:


www.besp-oakfurniture.co.uk

I liked this company due to them producing innovative and bespoke pieces of furniture, such as the one above.

www.sjsfurniture.co.uk

This company was selected because all their furniture is handmade, and I liked the rustic aesthetics that their furniture has.


www.rossmorebysherry.ie

This is a family run business, which is over 50 years old, and I feel like they would be one of the most likely businesses to answer any questions which I may have.


Three Fabric Companies:


www.kobe.eu

This company specialises in fabric and upholstery for furniture, and taking comments and demands from furniture makers.


www.yarwood.co.uk

This is a local company to me (Leeds), and could possibly used for contact in the future.

www.james-hare.com

This company  had the widest range of fabric available, and will be good to compare them altogether.

Three Lighting Companies:


www.tuscanorlighting.co.uk

They specialise in traditional lighting, which maybe the kind of furniture which I may have to design and make in the future.

www.searchlightelectric.com

I picked this company to look at as they seemed to have the most modem designs of lightning.

www.paulo-coelho.com

The final company that I will look at is a company which makes bespoke lighting depending on the requirements of the client, and also the furniture in the room.

Thursday 19 January 2012

Machine Production Techniques - Lesson Eight

I spent the beginning of the day fitting the drawers and making a wooden base. Fitting the drawers was simple but time consuming, and the drawer base is used as the drawer stop. The base was made out of a piece of wood which was the same size as the base, and then cut with 2/3rds on one side, and one 3rd on the other. This meant that there is a base for one side to sit on whilst shut, and an equal base to fix wheels into place.

Above: Drawers fitted and base installed.
I then decided to go buy some extras for the toolbox during lunch. This included wheels, a hasp, a lock and also another hinge. When I got back, the first thing was to fit the wheel. There are six wheels in total, four for the big base, and two for the small base. Two of these wheels are lockable, so you can stop it from moving.

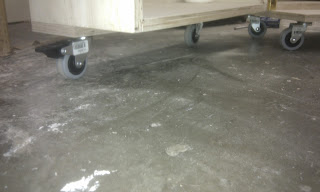
Above: Wheels fixed to the base of the toolbox
After fitting the wheels, I then added the hasp and lock.

Above: Hasp and Lock
After I completed these tasks, I decided to make my own modifications, as the wood for the table had not come in. The first thing was to fit a hinge and cut a door inside the cabinet. This is going to be used to hold my chisels in a rack that I made. I drilled a handle in the top left hand corner, similar to the drawer handles.


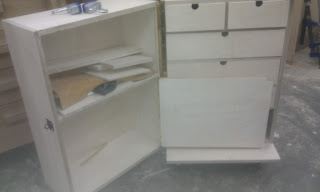
Above: Inside door hinged.

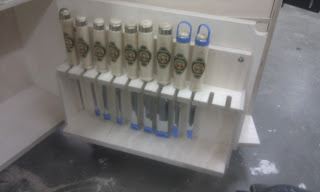
I then began work on the chisel holder. I started by marking out and drilling holes the size of each chisel (as they were all slightly different). I also added two extra holes for any chisels I might get in the future. Then using the band saw I cut slots to each hole to slide the chisels in.

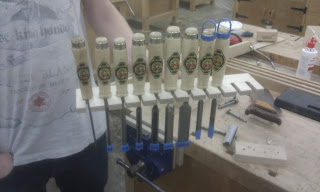
Above: Chisel holder with chisels.
I originally planned to fix this to the back of the door, however I then thought it would be better if I could take the chisels all out at the same time and put them onto the bench. Therefore I made a free standing chisel holder.
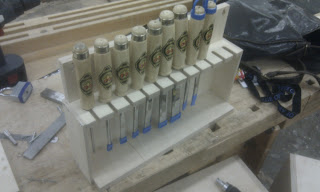
Above: Free standing chisel holder
I then made two drop screw holes in the chisel holder, and put two screws into the back of the door. This allows me to hang the chisels securely, but also take them out whenever required.

Above: Chisel rack fitted to door
Finally I made two saw holders on the back of the cupboard, so they wouldn't get damaged in a drawer, and are easily accessible.
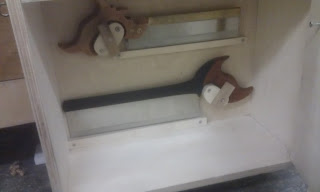
Above: Saw holders.
Overall for this part of the module things went relatively smoothly, and allowed me to use the basic machines in the workshop. I am glad I had time to customise my own side of the toolbox which was not limited to the module requirements, as I will be using it for many years to come, and do not know if I would have time in the future.


Wednesday 18 January 2012

Machine Production Techniques - Lesson Seven

Today lesson was spent cutting, fitting and gluing the drawers together. I first cut all the pieces for each drawer, and then fitted the fronts to each gap. 

Above: Fitting fronts to each gap
Once all the pieces were cut to the right length, I setup the router table to make all the grooves. However I cut grooves on some edges that didn't need them, so I had to cut them down, making the drawers smaller.

Above: Drawer with grooves and handle
Once I had grooved the drawers, I used a jig and the pillar drill to make the handles, and then clamped and glued them together. I tried to panel pin one of them, however all pins split the wood, and so I decided just to clamp them instead. Whilst the drawers were drying, I decided to cut and fit the hinge. This also included routering a groove so the box shut flush.

Above: Hinged together
I left the drawers to dry during the night, so will work on them when I get in tomorrow.


Thursday 12 January 2012

Machine Production Techniques - Lesson Six

After yesterdays lesson, the box was ready to be routered open. To do this, I first went to the metal workshop with another student to cut some metal bars to fix the guides to either side of the box. 


Above: Shows the metal bars holding guides in place
Because of the size of the toolbox we decided to work in pairs, and we split the boxes whilst another person was holding them in place. This made it much easier and safer to use the router.

Above: Router set up with extraction
After the box was split in two, I then cut the pieces for the dividers, and using a biscuit jointer created slots in each end, to slide them into place.

Above: Pieces cut to length

Above: Slot shown in place cut using biscuit cutter
For the end of this lesson I glued the dividers into place, ready to cut the drawers pieces to size.


Wednesday 11 January 2012

Quote

"Good design is obvious. Great design is transparent." - Joe Sparano

Machine Production Techniques - Lesson Five

We are back from Christmas, and carried on with the toolbox. The deadline is looming, as it has to be finished by the 19th, and I am know spending more and more time working on it. In this lesson I worked on a lot of things, and progress was fast.

I began by routeing out two grooves for a hardwood inlay, as this is where the hinge will be screwed into. I also marked out, cut and glued in where the biscuits would be by using a jig and a biscuit cutter.

Once I had done this, I was ready to do a dry test to make sure it fitted together, before I glued it.
Test dry fitting the toolbox carcass together
Clamping the toolbox up was quite a complicated task, so I got help from others around me. I added a couple of other clamps where the wood was slightly warped and not sitting correctly.

Toolbox clamped up ready for tomorrow
This means that the toolbox will be ready to be routed into two parts tomorrow, and that I can then start to create the shelves and dividers.

Wednesday 4 January 2012