Monday 25 March 2013
Wednesday 20 March 2013
OUFM203 - Day Eight
My (rather expensive) Soss hinges arrived last night, so I decided to spend the day designing, making and testing a jig to allow me to quickly and accurately route the insert for them, without having to pay for an expensive jig.
 |
| Above: The jig with replaceable inserts |
 |
| Above: Hinge installed in test piece. |
Tuesday 19 March 2013
OUFM203 - Day Seven
Today was the first day that I began to have problems. The main problem that I had which can be seen in the video below, was trying to close the gap between a couple of the planks that had to be glued together due to warping. This took most of the day to correct.
The rest of the day was spent sanding up the second extending leaves of the table top.
Monday 18 March 2013
OUFM203 - Day Six
Today I only had a few hours in the workshop, but I still progressed fairly quickly, as I had everything planned and ready before the weekend. The first task was un-clamping and setting aside the leaf that I glued up at the end of last week, and gluing up the second half of the extension leaf. This went really well, and only took about 15 minutes.
The next task was to lay out and check how I wanted the table top planks to be laid out. After some adjustments to the layout due to aesthetics and checking, I then thicknessed each plank down to 183mm, to make the complete top to 915mm. There was a problem with the last plank that cut it at an angle along the edge, but a bit of careful planning I managed to correct the issue.
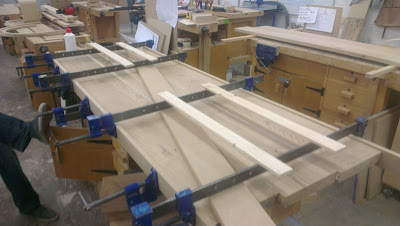
Then I dry fitted three of the boards together, as 915mm won't fit through the wide belt sander, meaning I am gluing the table top up in two sections. Once I checked that it would fit together perfectly, I glued up and clamped alternating sides, to evenly spread the pressure across the boards.
 |
| Above: Leaf Part Two Clamped and Glued |
 |
| Above: Table Top Section One Clamped and Glued |
Friday 15 March 2013
OUFM203 - Day Five
Today was the first day that I actually started to glue some of the components together. This was one leaf of the "L-Shape", which is on the bench behind mine in the video clamped up. This first piece went together perfectly, and has now been left over the weekend to dry.
I also finished up all the planing by cleaning up the boards that will make up both the main table top and extension. This was done so the grain flowed naturally, hopefully making the finished piece look like one whole top, and much more aesthetically pleasing. These were the only boards I had big problems with warping, and I had to plane them carefully in order to not run the risk of making them to thin.
In the video you can also see me laying them out, picking the best layout for the boards, and numbering them in the process, ready for next week.
Finally a test piece for the finish and stain is being applied in order to pick the perfect finish to match existing furniture which will be in the same room.
 |
| Above: Boards for one leaf of "L-Shape" gluing together |
 |
| Above: Test piece with currently two layers of stain, compared to white paper |
 |
| Above: Wood stacked up including table top boards to minimise movement |
Thursday 14 March 2013
OUFM203 - Day Four
Today was just spent squaring, planing and laying out the pieces for the "L-Shaped" extension table top. Sadly due having my materials in a separate room, and not having a camera in the machine shop, today's time lapse does not have much footage:
 |
| Above: The five boards ready to be glued together forming the "L-Shape" |
Wednesday 13 March 2013
Tuesday 12 March 2013
Monday 11 March 2013
OUFM203 - First Day
First day of OUFM203 was just sorting, labelling and checking the dimensions of the timber to make sure that I had selected enough pieces. Pictures of the day are below:
 |
| Above: View of wood labelled and stickered |
 | |
|
 |
| Above: Measure, Measure, Measure |
 |
| Above: Photo of table top laid out and marking out |
Sunday 10 March 2013
Subscribe to:
Posts (Atom)


