Thursday 15 December 2011

Machine Production Techniques - Lesson Four

This lesson was the last before the Christmas break, and I was eager to get as much completed as I possibly could. My next task was to create the grooves and rebates for the top, back, sides, front and back to slot into. To create theses grooves I used a hand router and also the overhead router.

Piece of wood with groove created by hand router 
These grooves took most of the lesson, as there were a limited number of routers available, so I had to wait till one was free.  The last thing that I did was to cut the front and back panels and then create a rebate on all the edges.

The hardest part of this lesson was getting comfortable with using the router, as I found it hard to control it on some of the edges. After this though, it was an easy and straight forward lesson. 

Wednesday 14 December 2011

Machine Production Techniques - Lesson Three

This lesson was the lesson when we cut all the wood for the toolbox carcass, and to do this we used the dimension saw, and worked as a class.

The main problem with working like this was the amount of time it took. This meant that cutting the panes which could have taken twenty minutes took over two hours. The advantage of this though was that all the pieces would be identical and cut to the correct size. After the wood was cut I labelled it up ready for tomorrow's lesson when I would start to groove and rebate the panels.

Thursday 8 December 2011

Machine Production Techniques - Lesson Two

This lesson was all about the different machines in the workshop. I didn't have time to take any photos as we were working in groups, but we all used every machine that would be needed in this module.

The machines we were inducted on were, the cross-cut saw, the ripsaw, the surface planer, the thickness planer, the band saw, the disc sander, the bobbin sander.

All the health and safety was written in a very helpful booklet, which allows me to use it at any time whilst in the workshop.

This lesson was very useful, as it now means that I know how to use each machine properly and safely whilst working on any modules in the future. 

Wednesday 7 December 2011

Machine Production Techniques - Lesson One

This was the first lesson for Machine Production Techniques, and we began by having a module briefing.

In the module briefing we spoke about what was required for the toolbox and also about the table with a drawer. After we received a booklet with information about the module, we learnt about how to set up and use a router.

The first thing was how to put a cutting piece into the router. To begin with you first lock the cutter into place using the press button, and then using a spanner undo the bolt.


Once the bolt is done, you can then put the cutter piece into the router. You simply slide it inside the bolt. One important thing is to make sure you go to at least the flat line pictured on the cutter, so you can not see the arrow head. Finally you just had to re-tighten the bolt to thumb pressure.
Minimum cutter depth
Once this was in place, we then learnt how to start the router. This is simply done by the right hand. To start you have to push the safety switch down with your thumb, and then pull in the finger trigger towards you. You can also lock the router on so it stays on at all time, and this is done by applying some more pressure to the thumb trigger and then realising it.  

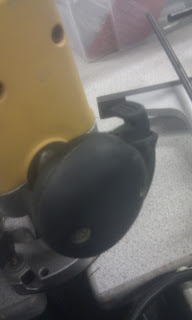
Right handle with thumb and finger trigger.
I then learnt another important thing when using a router, and that is the direction of cut. This means that when you are creating a rebate you want to be pushing it into the material, to stop it from catching the material and tearing the material. This can cause the router to jump towards you, and be very dangerous. The direction is clearing shown on the base of the router.

Direction of cut shown on the base of the router
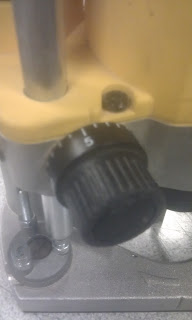
I then learnt the way to set the router for certain cuts, and this includes the depth of the cut. TO plunge the router into a material, you first realise the left handle by twisting it, and this then freely moves the router up and down. You then twist the handle again to lock it into place.

Arrows showing twisting motion of handle
 You can also set the depth using a depth stop, this is done by realising a wing nut on the side, and then twisting the bar to the bottom, this can be re-zeroed depending on different cuts.

adjusting screw

 You can also place the object that your rebating underneath the bar, so you easily cut to the right height.

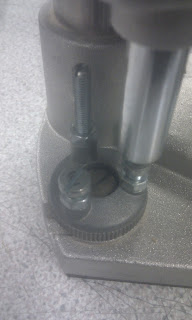
Area where you can place certain objects
Finally I learnt about the fence that you put on the router, and this allows you to make parallel cuts at any distance from the edge of the piece of wood.

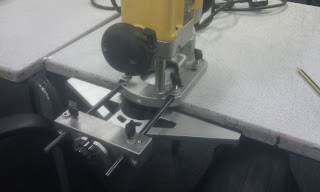
Router with fence attached
The first day was interesting as we learnt about the module, and also how to correctly set up a router, the hardest part was to learn how to lock the router so it would carry on when you realised the trigger.

Saturday 3 December 2011

Hand Production Techniques - Lesson Seventeen


Today the cabinet was handed in, and was completed on time. Over the last week I finished the drawers and drawer slips, however I joined the back on upside down on one, so had to use it for the second drawer, but it went together in the end.

Also when clamping up the first drawer, I forgot to put in the drawer slips, which meant i had to undo some of the clamps again to fit them in.

I also clamped up both drawers successfully, and created a handle and drawer stops in CAD and cut them out on the laser cutter.

Finally I veneered the board which I then cut up, and used as the drawer bottoms.

I have included photos of the different stages, as well as the finished cabinet.

Drawer stop Clamped up

Drawer clamped up